In this step-by-step guide, you will learn how to purchase a VPN (Virtual Private Network) subscription using Bitcoin, a popular cryptocurrency, and CyberGhost VPN, a trusted VPN service.
By the end of this article, you will have all the information you need to safeguard your online privacy and anonymity with the help of CyberGhost VPN while making your purchase using Bitcoin.
How to Buy VPN With Bitcoin Using CyberGhost VPN
Step 1: Visit CyberGhost VPN
The first step is to Visit CyberGhost.
CyberGhost VPN (review) is a reputable and popular choice that fulfills these requirements.
It offers a user-friendly interface, strong encryption, a wide range of server locations, and excellent customer support.
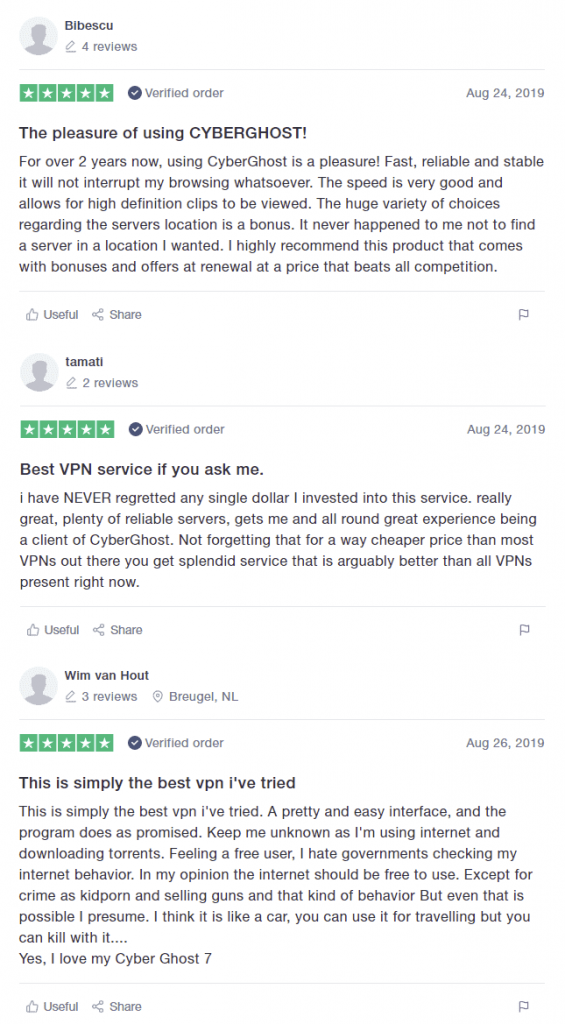
User’s seem to love it as well.

What’s more important, it accepts Bitcoin payments via Bitpay.
Click here to visit the CyberGhost VPN website to proceed to the next step.
Step 2: Select a Subscription Plan
On the CyberGhost VPN website, you will find different subscription plans.
All paid plans have the same features. Their only difference is the subscription time.
CyberGhost VPN offers various subscription options, including monthly, yearly, and multi-year plans.
I suggest you select the 2-Year plan, since it offers the biggest savings, plus 3 months free.
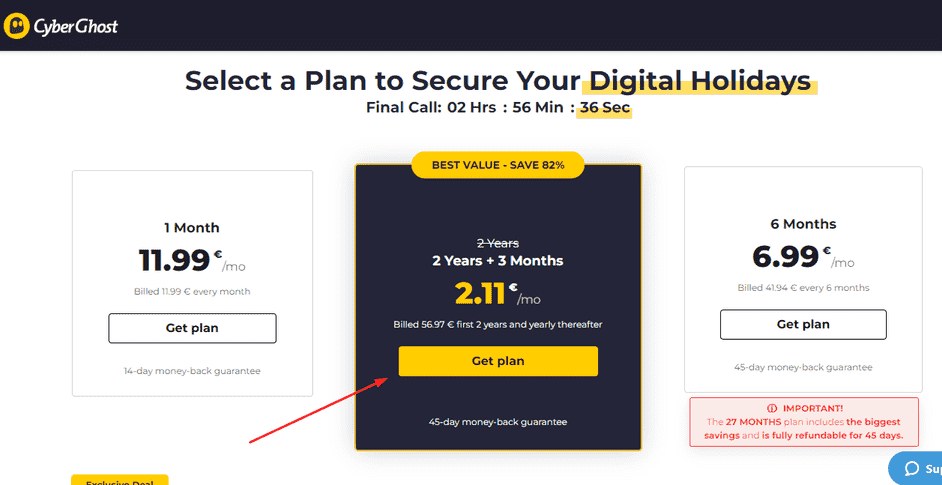
Essentially, you’ll be paying less than $70 and you’ll have one of the best VPN providers secure your online activities.
You also have a whopping 45 days to request your money back in case you are not satisfied with their service – which I doubt.
Anyway, to move to the next step, click the “Get Plan” button.
Step 3: Choose Bitcoin as the Payment Method
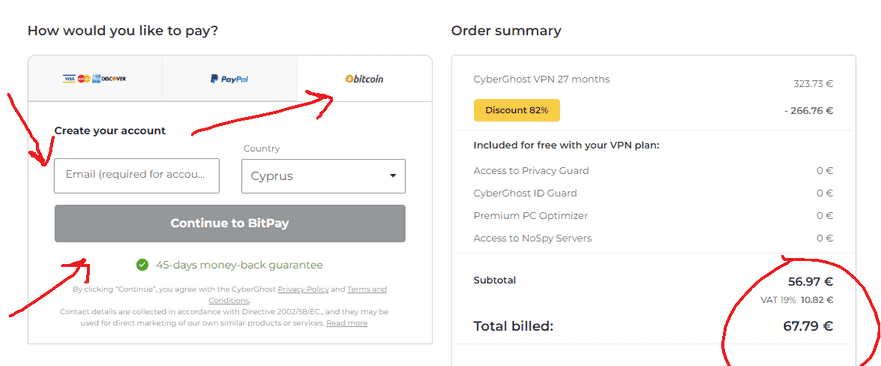
To continue with the purchase, choose Bitcoin as your payment processor.
A field to add your email will appear and the continue button will change to Continue to Bitpay. will change to you will be asked to provide your email address. Enter a valid email address that you have access to as this will be used for communication related to your subscription and click the “Continue to Bitpay” button.
Step 5: Connect your preferred wallet
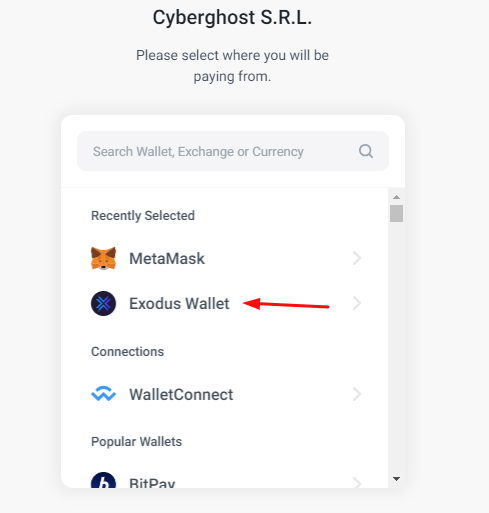
As soon as you hit the continue with Bitpay button, you will be taken to a new screen where you will have to connect your preferred wallet.
In my case, since I will be paying with Bitcoin, I will chose Exodus Wallet.
Exodus wallet supports both Bitcoin and Bitcoin Lightning Network payments, so choose the one you are most accustomed with.
Step 6: Select your coin
In the next step, just select the coin of your choice. As you can see from the screenshot below, you can choose Dogecoin, Bitcon Cash, Litecoin and over 50 different cryptocurrencies to buy VPN.
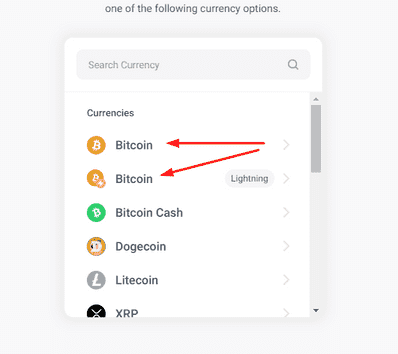
☝️ If you prefer using MetaMask, you will not be able to choose Bitcoin, since Metamask does not support the Bitcoin network.
Step 6: Scan QR code or manually enter transaction details to complete your transaction]
After choosing your crypto of choice (in our case – Bitcoin) a QR code will appear asking you to scan it or copy and paste the payment address to your preferred wallet to complete the transaction.
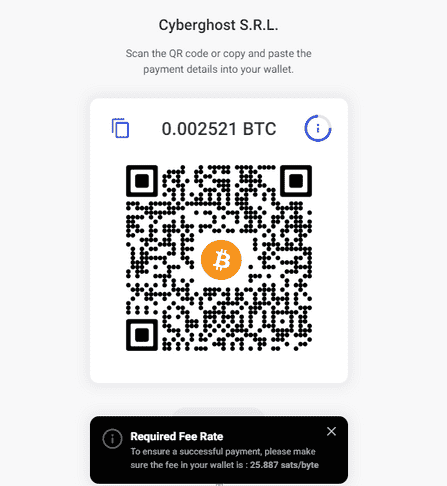
In my case, since I am using the Exodus Wallet, I’ll just pop-up my smartphone where I have the Exodus App installed and scan the QR code.
☝️ If you have the Exous Wallet browser extension you'll be prompted to connect to your browser wallet. This applies whether you chose Metamask for your payment.
Next, confirm the transaction details and send the Bitcoin.
You might have to wait for the blockchain to verify your transaction. Your transaction costs and the number of times the transaction must be validated in succeeding blocks will affect how long it takes.
At some point – usually not more than 5 minutes – the confirmation message will appear.
Step 7: Confirmation and Activation
Once the Bitcoin payment is confirmed, CyberGhost VPN will receive the transaction and validate it. This process usually takes a short while.
After verification, you will receive an email confirming your payment and providing instructions on how to activate your subscription.
Step 8: Activate Your Subscription
Follow the instructions provided in the confirmation email to activate your CyberGhost VPN subscription.
This typically involves creating a password and logging into your account. Once logged in, you will have access to the full range of features and server locations offered by CyberGhost VPN.
Bottom Line
Congratulations! You have successfully purchased a VPN subscription using Bitcoin with the help of CyberGhost VPN.
By following these steps, you have taken a significant step towards enhancing your online privacy and security.
Remember to connect to a CyberGhost VPN server whenever you go online to enjoy encrypted connections and anonymous browsing.
Stay safe and protected in the digital world!
READ NEXT
- How to Choose the Best VPN for Gaming
- 6 Best VPN Providers That Accept Monero
- Atlas VPN Review: Is it worth your time and money?
- People Increasing VPN, Tor Use to Avoid Media and Crypto Censorship
- TorGuard VPN Review: Pros & Cons and Features Analysis
Previous Articles:
- Near Protocol (NEAR) Surges 10% as Alibaba Partnership Sparks Investor Excitement
- Bitcoin Cash Skyrockets Over 100% in 7 Days, Fueled by EDX Exchange Listing
- SERPutation Blockchain SEO Agency – What Blockchain Firms Need For Success
- Patrick Hughes – Set To Launch New Mind Boggling NFTs On ElmonX
- BlackRock’s Bitcoin ETF Application Sparks Frenzy as Rivals Scramble to Follow Suit

